 This program
supports only the X10 FireCracker interface. The
Firecracker is a match-box sized device with two
"serial" DB 9 connectors
This program
supports only the X10 FireCracker interface. The
Firecracker is a match-box sized device with two
"serial" DB 9 connectorsCAUTION - This information is strictly for the do-it-yourself segment of the warm and hot glass community. While I do not think there are any more serious hazards involved than in any other kiln work, YOU ASSUME ALL RISKS. If you are overly concerned with codes, inspectors, and insurance, buy a turn-key system.
SIMP-CON is a PC based kiln control program which incorporates digit temperature measurement, ON-OFF control signals, data logging, and limited over-heat protection. The program allows up to twelve segments in a run, and any segment can be either a "ramp" or a "soak."
This "proof of concept" controller was made to run a small 120 volt kiln. I have used it to run a Hot Glass HG9, which I bought from Sundance. This kiln is rated at 120 volts, 14 amps, and comes equipped with an "infinite heat switch." The only "wiring" you will do involves the thermocouple, the optional alarm, and the "crowbar." All other required hookup is "plug in" connections between purchased components. Most of your wiring will be with low voltage circuits, so the only danger is that something will not work. I think you will end up with Underwriters approved devices in all high voltage circuits.
The approach will also work with some 220 volt kilns by using an X10 220 volt 20 amp appliance module but I have only done limited testing with this.
This is intended for "real junk," as far as current computer concepts go. The hardware is circa 1985 and the programming software circa 1992.
The minimum computer required is an IBM-PC compatible (8086 or 8088 processor), one floppy drive and one free serial port on the standard settings for COM1 or COM2, and, I’d guess, about 256 K of RAM. The FireCracker interface draws its small amount of power from the serial port, so it is possible, although not likely, that some ports may not work with it. If you want to provide for short power interruptions, either use a laptop or a UPS (Un-interruptible Power Supply). You will not need a mouse, and a mouse is not supported by the program.
The computer I use to control the kiln is an Amstrad PPC-640, a c. 1988 portable with two 3 1/2" floppy drives and an LCD monochrome screen. It has only one serial port. I used this machine because I had it, it is relatively compact, and I wasn’t using it for anything else.
You will need a version of MS-DOS or PC-DOS. If you want to edit the program, you’ll want a copy of Microsoft QBASIC or QuickBASIC. (The source code is not intended for BASICA, GWBASIC or VisualBASIC.) As I recall, DOS 5 and DOS 6 included QBASIC, but the QuickBASIC compiler was sold separately. When you find these, it will probably be in someone’s floppy disk archive. I will not provide you with copies of these Microsoft products.
DOS does not support multitasking, so you can’t use the computer for anything else while you are using it to control a kiln.
I did the programming on a ‘486 computer running MS-DOS. I used a single serial port for development testing. I’m sure it will also run on almost all ‘286 (AT)and ‘386 PC’s, the possible exceptions being some PC-2 or portables.
At this time, the program does not include a provision for auto-restart, but I plan to add that in later versions.
I’d suggest running from a floppy disk, formatted as a system disk The disk should include the program SIMP-CON.EXE in the root directory. You will find that the program adds several data files to this directory as you run it, so do not write-protect it. If you have no understanding of MS-DOS, you may need to get an "old consulting hacker" to set up the disk.
SIMP-CON will lock up if you try to make a "Run" without a Firecracker and metes, but the alternate DEMO-CON will let you look the program’s features without buying or installing any hardware. This version of SIMP-CON which has the thermocouple input and control outputs de-activated so that you can see how the program works without constructing the required hardware.
A compiled and fully working of the program is available in the Programs You Can Down-Load section of the project page. If you are interested in the detail of the program's functions, or wish to develop a customized version, the program source code is in the file SIMP-CON.TXT which can be run and/or compiled with QuickBASIC. My attempts to run the same source file directly with QBASIC (uncompiled) result in a "subscript out of range" error. You will probably need to rename the .TXT file you download with a .BAS extension.
The SIMP-CON program will not run under Windows, in a DOS Window, or on a Windows 9x computer rebooted in DOS mode because of the way hardware calls are made. It should run on a Pentium class machine if the machine is booted from a DOS system floppy, but this has not been tested. It will run on a computer normally running Win 3.x because this earlier version of Windows "runs on top of DOS," and you can exit Windows to run in true DOS mode. I have run DEMO-CON in a DOS Window on a Pentium class machine under Win '95.
The Control Output System
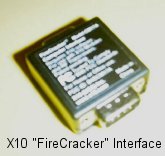
This program
supports only the X10 FireCracker interface. The
Firecracker is a match-box sized device with two
"serial" DB 9 connectors
This small device sends radio frequency signals
to a receiver which plugs into an ordinary power socket. I bought
the FireCracker Interface Kit (CK 18A-C) from http://www.x10.com
for $39.99, postage included. The kit includes the FireCracker
(CM17A) itself, a transceiver (TM751), a lamp module, and a
hand-held remote. You can probably find the Firecracker on eBay.
You can plug the FireCracker directly into the computer’s serial port, or you can put it at the end of a serial cable. (You may also need a 25-pin adapter between the FireCracker and the computer.) I put my FireCracker between my cable and my multimeter, as seen in the "meter" picture below.
There are several other X10 computer interfaces available, but the FireCracker has the advantage of being a pass-through device, allowing both the input and output interfaces to be placed on the same serial port, a major consideration for portable and laptop computers with only one COM port.
 The
Lamp Module which comes with the FireCracker kit is
rated at only 600 watts, so I also bought two 3-prong 15 amp
Appliance Modules. The lamp
module was used for the alarm.
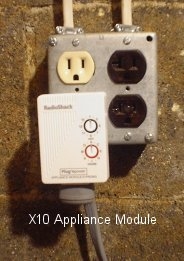
The
Lamp Module which comes with the FireCracker kit is
rated at only 600 watts, so I also bought two 3-prong 15 amp
Appliance Modules. The lamp
module was used for the alarm.
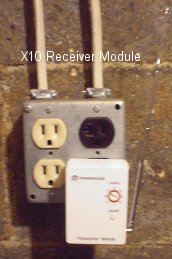
The receiver, or Transceiver Module, looks like an Appliance Module, but it is preset for only Unit 1, and has an antenna on the side. The transceivers and modules are available overseas in 220 volt 50 Hertz versions. I located several UK (British) home automation sources on the web: http://www.letsautomate.com - http://www.laser.com/ - and http://www.comfort.org.uk/products/x10.html
Some UK suppliers list UK, French, German, Australian, and European standard plug configurations. Incidentally, the comfort.org.uk web site says that the X10 protocol was originally developed in 1975 by Pico Electronics, in Glenrothes, Scotland, and according to Laser Business Systems Limited, the X-10 corporation itself was established in 1978, so this clearly isn’t an "American" system or something new.
As far as I know, The FireCracker interface is only available from X10 in the USA, but it takes its power from a standard serial port, so it should work with almost any computer running on any voltage.
Kiln Control Hardware Setup
 Set
the receiver and modules to the same House Code. Set
the Appliance Module for the kiln to Unit Code 1.
Set
the receiver and modules to the same House Code. Set
the Appliance Module for the kiln to Unit Code 1.
Plug the receiver into a power outlet.
Plug the appliance module into a power outlet, and plug your kiln into the module.
Set the kiln’s switch to "High" or "On." If the kiln turns on, turn it off with the button on the module or with the handheld remote. For safety’s sake, you will later want to use the kiln’s switch to turn the kiln off when you want to open it to handle pieces, or if you are using it as an annealer.
Off Topic Note: When I wired my "studio," I put two 110 volt circuits into dual outlet boxes. Ivory outlets are on one circuit, brown outlets on the other.
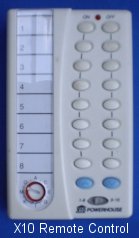 You
can test the module and kiln by turning it on and
off with the handheld remote. Don’t use the remote as a
switch when accessing glass, because the computer will just turn
it back on.
You
can test the module and kiln by turning it on and
off with the handheld remote. Don’t use the remote as a
switch when accessing glass, because the computer will just turn
it back on.
I’d strongly suggest that the computer and kiln should be on separate circuits, so that the computer continues to log data even if the kiln circuit breaker trips.
The Data Input System
The Digital Multimeter
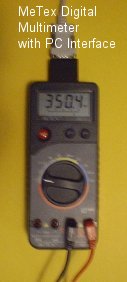 I
used a Metex ME-11 auto-ranging digital multimeter
with PC interface. I bought the meter on the Internet from
RadioShack.com for about $40. When not on sale, similar meters
cost about $60 at Radio Shack Stores. You also need a 9-pin
serial cable to connect the meter to the FireCracker control
interface. You may also want to buy a 9 volt battery eliminator
so that the meter can be powered from the main power line.
I
used a Metex ME-11 auto-ranging digital multimeter
with PC interface. I bought the meter on the Internet from
RadioShack.com for about $40. When not on sale, similar meters
cost about $60 at Radio Shack Stores. You also need a 9-pin
serial cable to connect the meter to the FireCracker control
interface. You may also want to buy a 9 volt battery eliminator
so that the meter can be powered from the main power line.
The Metex ME-11 reads to 0.1 mV. (1 mV = 1 millivolt = 1/1000 volt)
For a Type K thermocouple, 1 mV is about 4.37 F°, so there is no way we can control temperatures to less than about ±5°. The program uses a "dead zone" of 15° (±7.5° from target) between off and on to avoid excessive cycling.
In addition to the Metex ME-11, I have checked the instructions for the Radio Shack 22-805 meter and found that it uses the same computer coding.
Thermocouple Arrangement
 I
wrote the software expecting to use a thermocouple
with two junctions, and that the cold one will be immersed in ice
water. If a meter reading of "zero" is obtained, it is
taken as an indication of an open thermocouple circuit, and a
shut-down routine (with alarm) is initiated.
I
wrote the software expecting to use a thermocouple
with two junctions, and that the cold one will be immersed in ice
water. If a meter reading of "zero" is obtained, it is
taken as an indication of an open thermocouple circuit, and a
shut-down routine (with alarm) is initiated.
The program also allows for a "single junction" arrangement, in which case it asks the operator for a "room temperature" value. If a single junction is selected, a 5 minute uncontrolled heat is used at start-up so that a meter reading of "zero" can be used as an indication of an open thermocouple circuit.
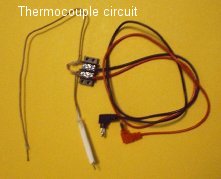 I’ve
been buying 18 inch Type K thermocouples from
Sundance Art Glass Center which list at $7.00 each. (Sundance Art
Glass Center, 179 Stierlin Road, Mountain View, CA, 94043,
800-641-6262, http://www.artglass1.com) It looks like a pair of
wires with fiber insulation. (It is.) One end has been stripped
and fused into a small ball. Strip the other end, twist the wires
together, and, if you have a glassworking or welding torch, fuse
a ball on the other. About 6 inches from one end, gently remove
about an inch of outer insulation, cut one of the wires, and
strip about ¼ inch of insulation from the cut wire. The second
end is the reference junction. On the thermocouple in the picture
I've added ceramic insulation tubes on the hot junction.
I’ve
been buying 18 inch Type K thermocouples from
Sundance Art Glass Center which list at $7.00 each. (Sundance Art
Glass Center, 179 Stierlin Road, Mountain View, CA, 94043,
800-641-6262, http://www.artglass1.com) It looks like a pair of
wires with fiber insulation. (It is.) One end has been stripped
and fused into a small ball. Strip the other end, twist the wires
together, and, if you have a glassworking or welding torch, fuse
a ball on the other. About 6 inches from one end, gently remove
about an inch of outer insulation, cut one of the wires, and
strip about ¼ inch of insulation from the cut wire. The second
end is the reference junction. On the thermocouple in the picture
I've added ceramic insulation tubes on the hot junction.
Plug the appropriate end of the leads into the meter, cut the probes off the other, and strip about ¼ inch of insulation from the end of the leads. If you don’t want to cut the meter leads, you can buy an additional set of plugs at Radio Shack.
Next we connect each lead to one of the wire ends we made in the loop. You could twist and/or solder the wires, but I prefer to use a screw connection "barrier" or "terminal strip." My first choice for a junction block is two sections cut from Radio Shack Cat. No. 274-678 ($2.19) with Radio Shack Cat. No. 274-656 (2 for $1.69) as a good second choice. In this application there is no need to worry about fastening the junction block down or wrapping it with insulation.
You can test the system by putting the "hot" junction in your mouth. (Turn on the meter and set it to 200 mV DC first.) This should produce a small meter reading. If the reading is negative, reverse the way the leads are plugged into the meter, or reverse them at the junction block.
Hardware Setup
Install the battery or eliminator in the meter.
Plug the cable into the meter and attach the other end to the FireCracker. Alternately you can put the FireCracker between the cable and the meter.
Set the dial to the appropriate place for DC millivolts. On mine, this is simply "DC volts" since it is an auto-ranging meter.
Attach the thermocouple, as outlined above. Install the "hot" junction in the kiln and put the "cold" junction in a cup of icewater.
Turn the meter on. If the meter reading is negative, reverse the thermocouple connections at the meter.
Optional Alarm
The program includes two provisions for an alarm. The set-up screen will allow you to specify a maximum kiln temperature, and will send a signal if this temperature is exceeded. You may also specify an alarm signal as a segment of your run profile so that you will be called when it is time to vent the kiln.
Hardware Setup
Option A - Buy a doorbell or chime module (X10 #2045) or siren (Radio Shack #RSU 12139606), set it to the same House Code as the other modules and to Unit Code 2, and plug it in.
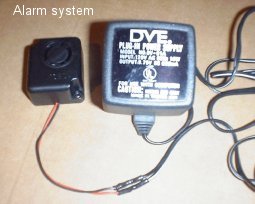 Option
B - Buy a buzzer and power adapter, connect them
observing proper polarity, and plug the assembly into a lamp or
appliance module. Set the module to the same House Code as the
other modules and to Unit Code 2, and plug it in. My alarm uses a
Radio Shack 273-079 12VDC Piezo Siren ($4.99) and an AC to 9 volt
adapter salvaged from an old device of some sort, and it plugs
into a lamp module.
Option
B - Buy a buzzer and power adapter, connect them
observing proper polarity, and plug the assembly into a lamp or
appliance module. Set the module to the same House Code as the
other modules and to Unit Code 2, and plug it in. My alarm uses a
Radio Shack 273-079 12VDC Piezo Siren ($4.99) and an AC to 9 volt
adapter salvaged from an old device of some sort, and it plugs
into a lamp module.
The alarm does not have to be at the kiln. It can, in fact, be almost anywhere else on the same property, and you can use multiple alarms in different rooms if you wish.
"Crowbar" Shutdown
Want to shut down a power station? Just throw a crowbar across the main wires, and the short circuit will blow the main breakers. Some electrical engineers call a device designed to cause a short-circuit shutdown an "electronic crowbar."
A run-away kiln can cause a lot of damage. One way this happens is if the relay(s) controlling the kiln elements fail while in the ON state. Glass in the kiln can overheat, melt through the insulating fire bricks, set fire to the floor, and burn your house down. At best, you’ll burn out the kiln elements and ruin the project in the kiln.
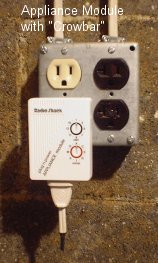 SIMP-CON
provides for over-heat shut-down with a simple
electronic crowbar. Actually you might consider the circuit
shown, an appliance cord cut, stripped, twisted, soldered, and
insulated with heat-shrink, more of a "hairpin" than a
crowbar, but it does the job nicely.
SIMP-CON
provides for over-heat shut-down with a simple
electronic crowbar. Actually you might consider the circuit
shown, an appliance cord cut, stripped, twisted, soldered, and
insulated with heat-shrink, more of a "hairpin" than a
crowbar, but it does the job nicely.
Hardware Setup
Set a second Appliance Module to Unit 5.
Buy a plug and connect a short length of wire between the terminals.
Insert the plug into the module, and plug it into an outlet on the same circuit as the kiln module.
Running the System
CAUTION - THIS PROGRAM HAS HAD ONLY LIMITED TESTING.
When the program starts, it will load the AUTOLOAD.TCP temperature profile file if you have previously saved one. This means you can run the same settings each time if you wish. It will also give you the opportunity to save and load other settings. It will also autoload the previous hardware settings.
The program runs strictly in text mode. When you run the program for the first time, you will be shown a title screen, then asked to set some hardware and software parameters. These include:
Your hardware profile will automatically be saved as AUTOLOAD.TCH, and will automatically be reloaded for following runs. If you change your hardware settings, the autoload file will be updated.
You will then be taken to the main menu which will allow you to create run profiles, run kiln cycles, and so on. To create an AUTOLOAD file, simply use that as the name when you save it. You will probably want to save it under a second descriptive name such as 8-PLATE or BROACH or PW-ANEAL, related to the type of work it was created to do.
A run profile can have up to 12 segments. Any segment can be a ramp, soak (hold), or alarm. You are expected to be familiar enough with your kiln to set reasonable values in a profile. This version does not automatically wait until the desired initial temperature is reached before beginning a segment. If you simply program a 1500° - 15 minute soak followed by a 900° - 15 minute soak, it is quite possible that the program will end without your kiln ever reaching 900°. You should be particularly careful when ramping down.
While a kiln cycle is running, the current clock time, cycle time, kiln temperature and target temperature will be displayed on screen. The screen will also give instructions for interrupting the cycle. Because X10 control signals are very slow by electronic standards, each measure-control cycle takes about 15 seconds.
If the controller doesn’t run properly, it may be because the receiver and module are on different sides of the 220-110 volt split line house splitting. Try moving one device to another outlet, or putting them both on the same outlet with an adapter.
I’d appreciate receiving comments from anyone testing any of the program.
Data Logging
The program automatically logs data for each kiln run in a text (.txt) file. The files are named by starting date and hour. They can be imported into any spreadsheet (Excel, Quattro, Lotus, etc.) for study, production of graphs, and so on.
I’ve found that loading of the data into my current version of Corel Quattro is somewhat erratic. (This appears to be a result of the spreadsheet program.) I use INSERT FILE type ASCII text (*.txt), and if it doesn’t load correctly, reload selecting "Delimited" and "Comma" from the options menu.